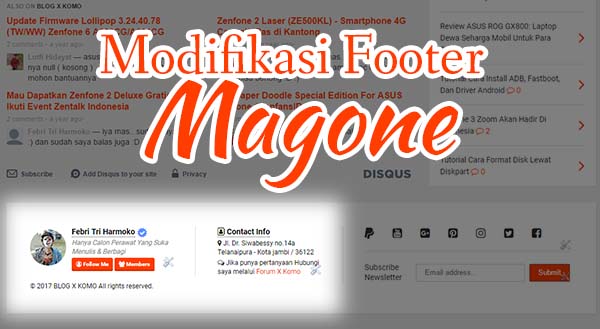
Bagaimana caranya mengganti tampilan atau mengatur widget pada footer template Magone versi blogger. Kamu bisa lihat bagian footer www.xkomo.com tampilan nya berbeda dengan tampilan footer bawaan magone.
Jika kamu tertarik untuk mengganti seperti tampilan milik xkomo.com silahkan simak tutorial berikut:
Langkah #1
Nonaktifkan Kunci Widget pada Footer Column 1 dan Footer Column 2, Caranya:
- Buka Theme > Edit HTML
- Cari tag <div id=’footer’> kemudian ganti locked=’true’ menjadi locked=’false’
- perhatikan pada tag widget <b:widget ….>
[text text_format=”on”]
<div id='footer'>
...

...
<b:widget id='HTML8' locked='false' title='' type='HTML'>
[/text]
- Cari aja Locked=’true’ di widget nya, harusnya ada 2 kode widget di dalam <div id=’footer’> yang kondisinya locked=’true’
Setelah ketemu dan berhasil di ubah, sekarang lanjut ke tahap ke 2.
Langkah #2
- Buka Layout dan perhatikan pada Footer Column 1 dan Footer Column 2
sekarang sudah bisa kamu hapus atau ganti dengan widget lain. - Silahkan tambahkan widget HTML/Javascript ke Footer Coloumn 1 & 2
- Isi masing – masing widget dengan kode HTML / Javascript sesuai kebutuhan kamu 🙂
Langkah #3
Jika ingin menambahkan Profile blog seperti yang ada di xkomo.com, silahkan ikuti cara ini:
Copy Code ini ke widget HTML/Javascript di Footer Coloumn 1
[text text_format=”on”]
<div id=id-card">
<img src="https://1.bp.blogspot.com/-sid62PCoJlw/WJYeWEQcXHI/AAAAAAAAGTA/gl5tkT-AtkEtnlLGSyKp-UgLLJ01jzm9ACLcB/s1600/BLOG%2BX%2BKOMO%2BAva.jpg" class="img-id-card"/>
<div class="title-id-card">
<span class="name-id-card">Febri Tri Harmoko</span><span class="fa-stack fa-lg">
<i class="fa fa-check fa-stack-1x"></i>
<i class="fa fa-ban fa-stack-2x fa-certificate"></i>
</span>
<span class="caption-id-card">Hanya Calon Perawat Yang Suka Menulis & Berbagi </span>
</div>
<div class="subscribe-id-card">
<span class="followme-id-card"><a href="//plus.google.com/u/0/b/105788850796511825588/105788850796511825588" target="_blank" title="Follow Me"><i class="fa fa-user-circle-o" aria-hidden="true"></i> Follow Me</a></span>
<span class="join-id-card"><a href="//www.blogger.com/follow.g?view=FOLLOW&blogID=4848727032668058109" target="_blank" title="Join This Site"><i class="fa fa-users" aria-hidden="true"></i> Members</a></span>
</div>
</div>
[/text]
Silahkan ganti yang saya tandai di atas sesuai kebutuhan kamu.
Selanjutnya simpan Style CSS berikut di Admin Header Custom Code (HTML / JavaScript / CSS)
[text text_format=”on”]
<style type="text/css">
div#id-card {
margin: 0 auto;
padding: 0;
}

img.img-id-card {
float: left;
margin: 5px 10px 10px 0;
position: relative;
clear: both;
-webkit-transition: all 1s ease;
-moz-transition: all 1s ease;
-o-transition: all 1s ease;
-ms-transition: all 1s ease;
transition: all 1s ease;
border-radius: 100%;
margin-bottom: 5px;
width: 65px;
}
span.name-id-card {
font-weight: bolder;
margin: 0 auto;
font-size: medium;
border-bottom: 1px dotted #333333;
font-size: 14px;
}
span.followme-id-card a {
padding: 5px 8px 3px 8px;
background: #ff3d00;
border-radius: 3px;
color: white;
font-weight: bold;
border-bottom: 3px solid #d63300;
}
span.join-id-card a {
padding: 5px 8px 3px 8px;
background: #ff3d00;
border-radius: 3px;
color: white;
font-weight: bold;
border-bottom: 3px solid #d63300;
}
.subscribe-id-card {
margin-top: 8px;
font-size:10px;
display: inline-block;
}
span.caption-id-card {
font-style: italic;
color: grey;
display:block;
font-size: 12px;
}
span.followme-id-card a:hover, span.join-id-card a:hover {
position: relative;
top: 2px;
border-bottom: 0px solid transparent;
}
span.followme-id-card a:active,span.join-id-card a:active {
box-shadow: inset 2px 2px 0px #d63300;
}
img.img-id-card:hover {
-webkit-transition: all 1s ease;
-moz-transition: all 1s ease;
-o-transition: all 1s ease;
-ms-transition: all 1s ease;
transition: all 1s ease;
-webkit-transform: rotate(360deg);
-moz-transform: rotate(360deg);
-o-transform: rotate(360deg);
-ms-transform: rotate(360deg);
transform: rotate(360deg);
}
span.fa-stack.fa-lg {
font-size: 10px !important;
margin-left: 3px;
}
i.fa.fa-check.fa-stack-1x {
color: white;
z-index: 2;
}
i.fa.fa-ban.fa-stack-2x.fa-certificate {
color: #5890ff !important;
z-index: 1;
}
span.-title-contact-info {
font-weight: bolder;
margin: 0 auto;
font-size: medium;
border-bottom: 1px dotted #333333;
font-size: 14px;
font-weight: bolder;
}
div.content-contact-info {
display: block;
margin-top: 3px;
font-size: 12px;
}
span.address-contact-info {
display: inline-block;
margin-bottom: 3px;
}
.copyright-line-1 {
float: left;
margin: 0 auto;
clear:both;
padding-right: 3px;
}

</style>
[/text]
Save 😉 Widget Profile di Footer Coloumn 1 Sudah berhasil kamu tambahkan.
Kemudian Untuk Widget Footer Coloumn 2 bisa kamu tambahkan Kode HTML berikut ke Widget di HTML/Javascript Footer Coloumn 2
[text text_format=”on”]
<div class="contact-info-footer"><span class="-title-contact-info"><i class="fa fa-address-book-o" aria-hidden="true"></i> Contact Info</span>
<div class="content-contact-info"><span class="address-contact-info"><i class="fa fa-map-marker" aria-hidden="true"></i> Jl. Dr. Siwabessy no.14a Telanaipura - Kota jambi / 36122</span><span class="phone-contact-info"><i class="fa fa-comments-o" aria-hidden="true"></i> Jika punya pertanyaan Hubungi saya melalui <a href="http://forum.xkomo.com" target="_blank">Forum X Komo</a>
</span>
</div></div>
[/text]
Silahkan ganti yang saya tandai sesuai kebutuhan kamu.
Terakhir tambhkan kode Style CSS untuk widget ini di Admin Header Custom Code (HTML / JavaScript / CSS) tepat di atas </style>
[text text_format=”on”]
span.-title-contact-info {
font-weight: bolder;
margin: 0 auto;
font-size: medium;
border-bottom: 1px dotted #333333;
font-size: 14px;
font-weight: bolder;
}
div.content-contact-info {
display: block;
margin-top: 3px;
font-size: 12px;
}
span.address-contact-info {
display: inline-block;
margin-bottom: 3px;
}
.copyright-line-1 {
float: left;
margin: 0 auto;
clear:both;
padding-right: 3px;
}
[/text]
Save dan Selesai 🙂
Bagaimana menurut kamu tentang tutorial modifikasi footer Magone template versi blogger ini 🙂 Cukup mudah kan, tidak terlalu sulit.
Jika ada pertanyaan silahkan tulis saja di komentar atau di forum saya (sub-forum Blogger), Jangan lupa untuk bantu share artikel ini dan juga subscribe blog ini jika berkenan 😉


